How to Roast a Ribeye: Achieve Tender, Juicy Perfection
There are few culinary triumphs as satisfying as a perfectly roasted ribeye. Imagine a glistening, mahogany crust giving way to a tender, rosy interior, each slice bursting with rich, beefy flavor and unparalleled juiciness. A Master the Ribeye Roast: A Show-Stopping Feast for Any Gathering is not just a meal; it's a centerpiece, an event, a declaration of culinary excellence that transforms any gathering, from a casual family dinner to a grand holiday feast, into an unforgettable occasion.
While often associated with high-end steakhouses, preparing a magnificent ribeye roast in your own kitchen is entirely achievable. This guide will walk you through every step, ensuring you unlock the full potential of this premium cut, resulting in a melt-in-your-mouth experience that rivals any restaurant.
Mastering the Prep: The Foundation of Flavor
Success with a ribeye roast begins long before it ever sees the heat of the oven. Proper preparation is the cornerstone of tenderness and flavor. Don't rush these initial steps; they are critical to the final result.
Bring it to Room Temperature
One of the most crucial, yet often overlooked, steps is allowing your ribeye roast to come to room temperature before cooking. Remove the roast from the refrigerator at least 30-45 minutes before you plan to cook it. This isn't just a suggestion; it's a game-changer. A cold roast hitting a hot oven will cook unevenly, resulting in an overcooked exterior and a potentially undercooked center. By bringing it closer to room temperature, you ensure more consistent heat penetration, leading to an evenly cooked interior from edge to edge and a beautifully seared crust.
The Art of Seasoning: Dry Brine for Deeper Flavor
Seasoning a ribeye roast is more than just sprinkling a few spices; it's an opportunity to build deep, complex flavors. Begin by generously salting the roast immediately after taking it out of the refrigerator. Ensure all sides are thoroughly coated. This initial salting acts as a dry brine:
- Initially, salt draws moisture from the surface of the meat.
- This moisture then dissolves the salt, creating a concentrated brine.
- Over time (during the 30-45 minutes at room temperature), this salty liquid is reabsorbed into the meat, breaking down muscle fibers and seasoning the roast from within. This process enhances moisture retention and deepens the beef's natural flavor profile.
Just before the roast goes into the oven, after its resting time at room temperature, it's time for the final flavor layer. This is where you can truly customize your roast. Beyond the foundational salt, add freshly ground black pepper to all sides. Then, choose your preferred seasoning mix or rub. Popular choices include:
- Classic Herbs: Rosemary, thyme, oregano.
- Garlic & Onion: Garlic powder, minced dried onion.
- Spicy Kick: A pinch of cayenne pepper or smoked paprika.
- Italian Blend: A ready-made Italian seasoning mix.
Expert Tip: If using multiple dry seasonings, mix them together in a small bowl first. This ensures an even distribution of flavors across the entire roast. Gently press the seasoning mix into the meat with your fingertips to help it adhere and form a flavorful crust.
Always remember to place your ribeye roast in the baking dish with the fat side up. As the roast cooks, this layer of fat will slowly render, basting the meat below and infusing it with incredible flavor and moisture, contributing significantly to that tender, juicy perfection we're aiming for.
The Roasting Process: High Heat for a Perfect Crust
Once your ribeye roast is perfectly prepped and seasoned, it's time for the main event: roasting. The high-heat method detailed here is designed to create a beautiful, savory crust while ensuring the interior reaches that coveted medium-rare doneness.
Preheat and Place
Preheat your oven to a scorching 500 degrees Fahrenheit. This initial high heat is crucial for developing a rich, caramelized crust on the exterior of the roast. While the oven is heating, place your seasoned ribeye roast in a shallow baking dish, ensuring it's fat side up, on the middle rack of the oven. A shallow dish allows for better airflow around the roast, promoting an even crust.
Estimating Roasting Times and Monitoring Doneness
Ribeye roast comes in various sizes, typically ranging from a three-pound cut perfect for a smaller gathering to a six-pound (or even larger) showstopper for a bigger feast. Naturally, cooking times will vary significantly based on the roast's weight and thickness. A helpful rule of thumb for estimating total cooking time is approximately 20 minutes per pound.
- For a 3-pound ribeye roast, expect about 60 minutes of cooking time.
- For a 6-pound ribeye roast, plan for roughly 120 minutes (2 hours).
Important Caveat: These are estimates. Ovens can vary wildly, and the exact thickness of your roast will also play a role. The most reliable way to achieve your desired doneness, especially the highly sought-after medium-rare, is to use an in-oven leave-in thermometer. This allows you to monitor the internal temperature without constantly opening the oven door, which causes temperature fluctuations and extends cooking time.
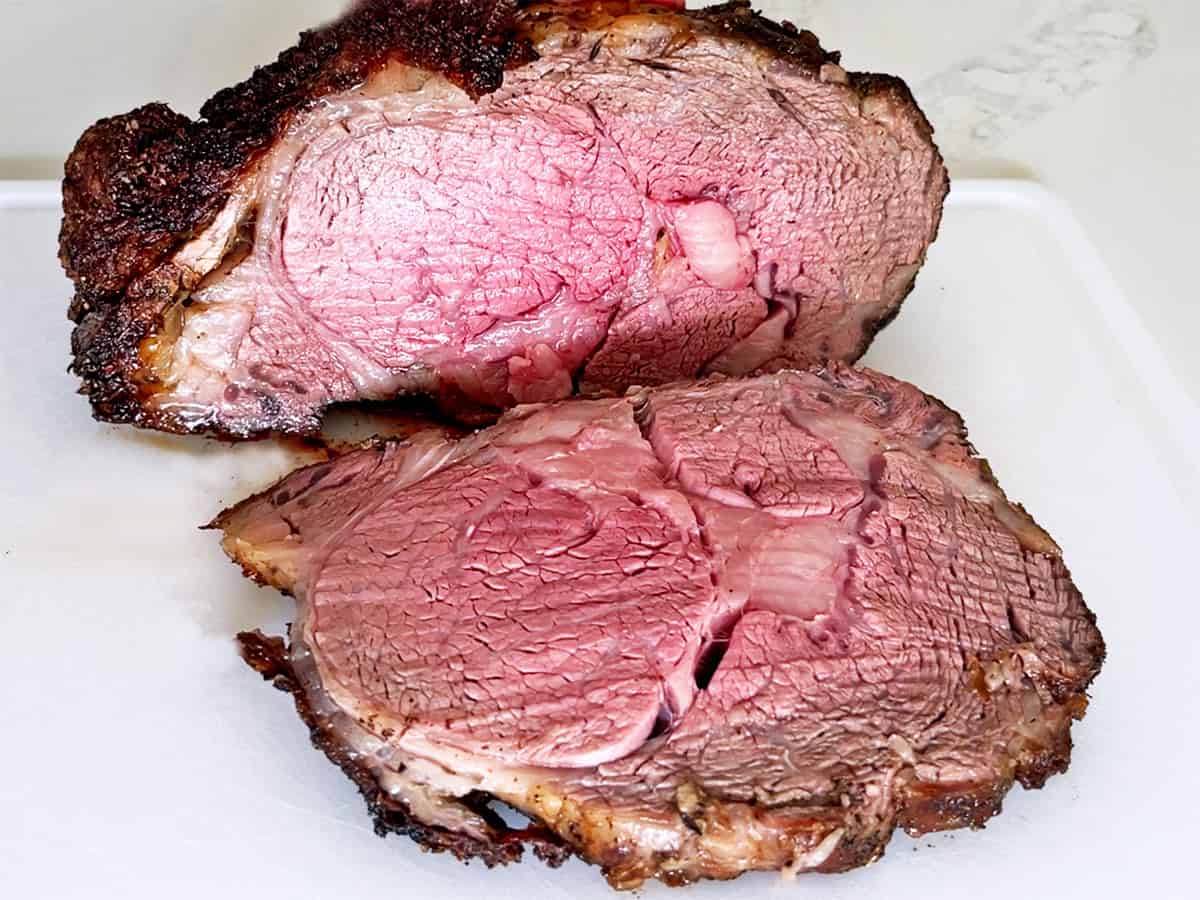
For a perfect medium-rare, aim to pull your ribeye roast from the oven when its internal temperature reaches 125-130°F. Remember, the roast will continue to cook and rise in temperature by another 5-10 degrees during the resting period (known as carryover cooking). For precise temperature guidelines, explore our detailed guide: Perfect Ribeye Roast: Essential Tips for Medium-Rare Doneness.
To Baste or Not to Baste?
Basting is an optional step. While not strictly necessary for a juicy ribeye, some chefs enjoy brushing the roast with garlic butter or a small amount of olive oil 2-3 times during cooking. This can enhance the crust's flavor and add an extra layer of richness. However, if you opt to baste, do so quickly to minimize the time the oven door is open and heat escapes.
The Critical Resting Period and Serving
You've successfully roasted your ribeye to the perfect internal temperature. Now comes a step that is as crucial as the roasting itself: resting.
Why Resting is Non-Negotiable
Once you remove the roast from the oven, resist the urge to slice into it immediately. Transfer the roast to a cutting board and tent it loosely with aluminum foil. Let it rest for at least 15-20 minutes, or even longer for larger roasts (up to 30 minutes). During cooking, the muscle fibers contract, pushing the juices to the center of the roast. Cutting into it too soon will cause these precious juices to spill out onto your cutting board, leaving you with a drier, less flavorful meat.
Resting allows the muscle fibers to relax and the juices to redistribute evenly throughout the entire roast. This results in every slice being incredibly tender, juicy, and flavorful – the hallmark of a perfectly cooked ribeye.
Carving and Serving Your Masterpiece
After resting, carve your ribeye roast against the grain into thick, impressive slices. The grain refers to the direction of the muscle fibers. Cutting against it shortens these fibers, making each bite more tender. Serve immediately with your favorite accompaniments, such as roasted vegetables, mashed potatoes, or a simple pan sauce made from the drippings.
Conclusion
Roasting a ribeye roast might take a little longer than a quick weeknight steak, but the tender, juicy, and supremely flavorful results are unequivocally worth the wait. By following these steps—from proper preparation and generous seasoning to precise roasting and the all-important resting period—you'll consistently achieve a show-stopping dish that will impress your family and guests alike. Embrace the process, trust your thermometer, and prepare to enjoy the magnificent rewards of a perfectly cooked ribeye roast right in your own kitchen.
